Friday 31 May 2013

How To Install / Flash ClockworkMod Recovery On Your Android Smartphone [TUTORIAL]

Because of its relatively open nature, Android is a whole lot more fun to play around with than Apple’s iOS. One very important tool, which is in just about every flashaholic’s phone isClockworkMod Recovery and today we’ll be talking about some of its useful features and how you can install it on your phone.

image446

ClockworkMod Recovery (CWM) is a custom recovery for Android devices which replaces the stock recovery, allowing users perform some very powerful actions. One of its main features is allowing users to make comprehensive backups, restore said comprehensive backups in case of a technical disasters, flash custom ROMS/themes/hacked apps, install updates to Android operating system manually and more. We will be referring to this guide whenever we talk about flashing custom ROMS or custom hacked apps.

How to Flash ClockworkMod Recovery

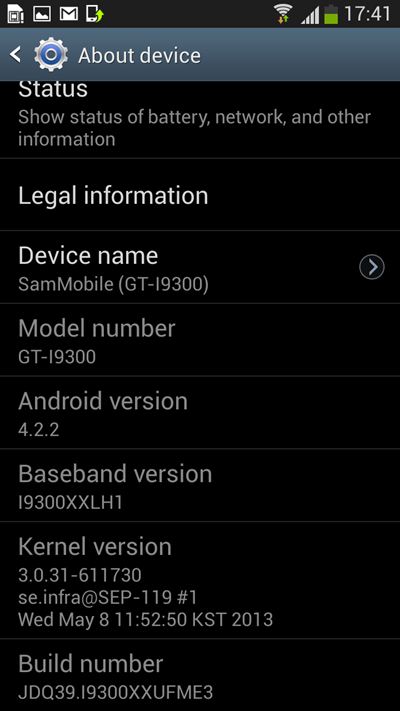
Before you can install ClockworkMod Recovery on your Android device, it is absolutely essential that your device is rooted first. As there are hundreds of Android smartphones and tablets available in the market, it would take a short book to cover rooting methods for them all. The easiest way to find out the process for rooting is to perform a Google search: “how to root <your device name here> on <version of Android you’re using here>”. You can find out the version of Android by navigating to Settings > About after tapping the Menu key.

Once you’re rooted, you must flash ClockworkMod Recovery. For most phones, the method mentioned below works flawlessly, however, for devices like the HTC HD2 and Nook Color, which do not come installed with Android, you will need to find out another way to flash CWM using the search engine of your choice.

Step 1: Download and install ROM Manager FREE [Market Link] on your Android device. You can also install the Premium version [Market Link] if you wish to remove ads and have access to more ROMs.

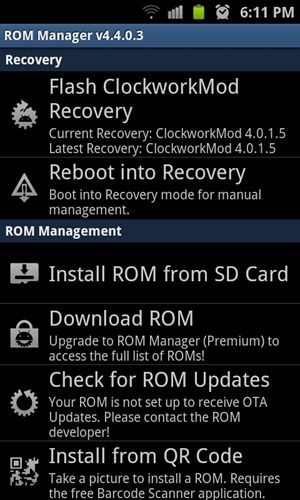
Step 2: Launch ROM Manager. From the main menu, tap on Flash ClockworkMod Recovery.
SC20110907-181118

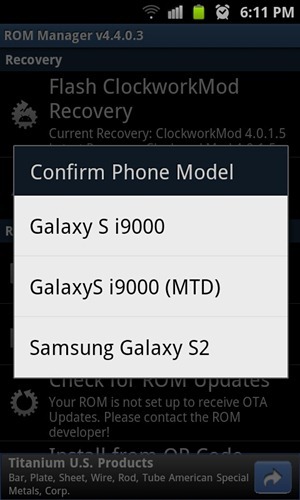
Step 3: You will be asked to confirm your phone’s model. Although this is a simple option to choose, there are many phones which come with different models which require a different version of CWM. Once again, use Google to find out which model you have. We’ve got a Samsung Galaxy S II, so we chose the appropriate option.
SC20110907-181123

Step 4: Your phone will reboot after downloading and flashing CWM.

Now, if you wish to boot into CWM, you have a couple of options. Your first option is to launch ROM Manager and tap Reboot into Recovery. If this method does not work for you (it doesn’t for us on our Galaxy S II), your second option is to reboot into CWM manually.

To reboot into CWM manually, shut down your phone by holding the power button. Once it is shut down, you have to press an exact button combination on your phone while it is booting up. For most phones, it is Volume Down + Power Key, but it is best to look up “how to boot into clockworkmod recovery <your device name here>” on Google to ensure you’ve got the right button combination. Just so you know, our Galaxy S II unit requires Volume Up + Home + Power buttons to be pressed while booting up to get inside CWM.

Be sure to check out our Android Apps gallery to explore more apps for your Android device.

You can follow us by "like" our Facebook page to keep yourself updated on all the latest from Microsoft, Google, Apple and the web.

Thursday 30 May 2013

Root Galaxy S3 On Android 4.1.2 [How-To Tutorial]

Samsung has adopted a yearly cycle of releasing new flagships in its Galaxy lineup of Android smartphones, and this year was no exception, brining to Android fans all across the globe the new and fabled Galaxy S4. While the latest king has already taken the throne and caused its predecessor, the Galaxy S III GT-I9300, to step aside in the smartphone arena, there’s no denying the fact that the device still remains a very capable and powerful one, fulfilling the needs of millions of users out there. Another testament to the fact is that Samsung is continuing to bring newer firmware for Galaxy S III International, with the latest one being released just this month, coming with PDA build I9300XXEMC2 and Android version 4.1.2. While the Galaxy S III still has to see an official Android 4.2 Jelly Bean update from Samsung, there are open source, community driven projects available that can let you taste the latest Android on GT-I9300. If you don’t opt that way, you may want to root your device on the latest firmware, for which we offer you this guide.

Before we get to the actual rooting process, allow me to clarify that as of this writing, I9300XXEMC2 is the latest officially available firmware for the international version of Samsung Galaxy S III GT-I9300, distributed by Samsung through Kies. It comes with Android 4.1.2 Jelly Bean, and offers improvements over previous versions like faster app launcher redraws, faster launching of applications, improved performance of the Phone and Contacts apps, better RAM utilization, and other general enhancements. The battery life also seems to have improved, but will vary from one usage scenario to the other.

root gs3 412 JB

The root method that we will opt for here will make use of Chainfire’s CF-Root, which is arguably the easiest rooting technique for a huge variety of devices by now. Do understand, however, that while this method is tried and tested, we or the developer cannot take any responsibility for any damage to your device as a result of following these instructions. Proceed at your own risk.

Requirements
Procedure

Step 1: Download both Odin3 and CF-Auto Root packages from the link above. Extract the contents of the root package to a location of your choice.

Step 2: Launch Odin3, click the PDA button and select the .tar.md5 file that you extracted from the CF Root package.

Step 3: Make sure that Re-partition is unchecked in Odin3, and that nothing is selected in PIT.

Step 4: Turn off your Galaxy S III an
d put it in download mode by pressing and holding volume down+power+home at the same time, and then pressing volume up for confirmation.

Step 5: With your device in Download Mode, connect it to the PC using the USB cable. If all went correct, Odin3 will detect the device, indicated by a COM address in the top left corner of Odin3.

Step 6: Double check that the correct PDA file is selected and that re-partition isn’t checked, and hit the Start button to begin flashing the rooted kernel.

Step 7: Once the flash is complete, the phone will reboot and enter recovery mode, automatically initiating the rooting procedure. It will reboot once more.


That’s it – your Galaxy S III GT-I9300 is now rooted on the latest XXEMC2 firmware. Enjoy!


You can follow us by "like" our Facebook page to keep yourself updated on all the latest from Microsoft, Google, Apple and the web.

Apple Releases New 16GB iPod touch With 4-inch Retina Display, No iSight Camera, Discontinues 4th-Generation Model

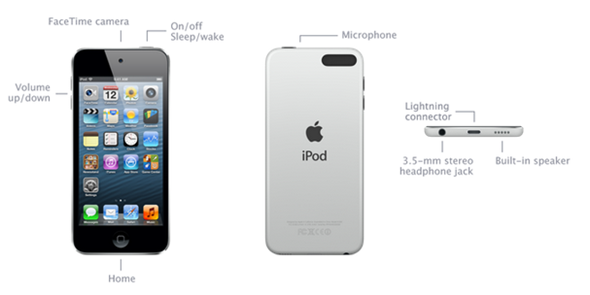
We are used to seeing Apple holding large press and media events, with the intention of generating the maximum interest possible for any new hardware launch. But it seems that the relatively silent launch of the new 16GB iPod touch has passed by without any fuss coming from Cupertino campus. The immediate release of a 16GB variant of the fifth-generation iPod touch may have taken a few by surprise, especially considering the timing is only a few weeks shy of Apple’s annual WWDC, but it serves as a replacement for the fourth-generation 16GB model that remained on sale when the larger 4-inch iPod touch 5G was announced last year.

As you might expect, the latest addition to the iPod touch lineup comes with a full 4-inch Retina display to compliment the existing 32 and 64GB models. Prospective purchasers of the smaller capacity fifth-generation model will benefit from the embedded dual-core A5 processor that ships with the media player as well as redesigned Apple EarPods that were heavily featured in the announcement keynote last year.

ipodtouch-16-gallery1-2013

The good news is that the new device is available immediately through the online Apple Store at a cost of $229. However, those cost-savings seem to come at a price with the trade-off being that the 4-inch personal media player will only be available with black and slate aesthetics. We’ve previously been used to only getting our iOS devices in either black or white, but last year’s introduction of multiple color choices for the iPod touch certainly proved to be popular amongst younger music lovers.

new iPod touch specs

Apple has also made a number of amendments to the technical specifications of the cheaper device. The forward facing camera has made it through the design process but it seems like the rear 1080p capable camera has been removed as part of the process of keeping costs at a minimum. It seems that this latest iOS device launch is aimed at the budget end of the market and could be specifically targeted at those who want to get their hands on their first iOS device without having to part with too much cash – cue the speculation about a budget iPhone!

new iPod touch

The latest model iPod touch is available to purchase now from Apple’s online store and should be hitting physical retail outlets in the coming days.

You can follow us by "like" our Facebook page to keep yourself updated on all the latest from Microsoft, Google, Apple and the web.

How To Permanently Carrier Unlock Galaxy S III & Galaxy Note II For Free [Tutorial]

One of the biggest hindrances with buying a top-of-the-line smartphone, is the premium price that you have to pay for it. There are usually two ways of how high-end phones are sold; either you pay the full price to the manufacturer and get an unlocked device, whereby getting the freedom to go with whatever network fancies you. Or, you may opt to buy the phone through a wireless carrier, where you pay a much subsidized rate for a big trade-off: getting stuck with that carrier for the term of your contract. In the latter case, the carrier pays the full price to the manufacturer but sells you the device at a much lower rate, and in turn, locks down the smartphone to their network, so you cannot use a SIM card from another network just like that. That’s a generally agreeable rule for most users.

However, there might be cases when you don’t want to remain stuck with the same cellular service provided, especially if there services aren’t satisfactory. There might also be times where you want to travel abroad, want roaming, but don’t want a local carrier that’s partnered to the one you’re subscribed to. Still others might be times when you just want to unlock your phone. Now, these phones are locked via software code, not at the hardware level, so there’s always a good chance that a good device tinkerer will be able to unlock it and let you get a job done for free that would otherwise cause your wallet to go lighter, even if marginally. Well, if you happen to own a Galaxy Note II, or a Galaxy S III, you might be able to network unlock your Android smartphone entirely free of cost!


unlock GS3 NoteII

The method comes courtesy of the folks over at XDA-Developers, who uncovered a hidden menu buried deep in Samsung’s own software that lets you unlock a pre-locked device. There are some factors to consider before attempting this, however. One, it will work ONLY on locked devices – we don’t know what might happen if you try that on an already-unlocked Galaxy Note II. Two, this method has been tested with only N7105 for the Note II, and while it has been reported to work for the N7100 and some Galaxy S III models, they’re not guaranteed. Three, meddling with these areas of your phone is seriously risky business, so proceed at your own risk.

Please note that these instructions will only work if you’re running Android 4.1 or higher.

Procedure

Step 1: On your Galaxy Note II, launch the phone app and press these keys: 
*#197328640#

Step 2: From the Main Menu, navigate to [1] UMTS > [1]Debug Screen > [8] Phone Control > [6] Network Lock > Options.

Step 3: In the Options screen, choose [3] Perso SHA256 OFF. Wait for 30 seconds after making this selection.

Step 4: Go back one step by pressing the menu key, and then back once. You should now again be in [6] Network Lock

Step 5: Here, now choose [4]NW Lock NV Data INITIALLIZ. Wait for one minute after making the choice.

Step 6: After a minute has passed, reboot your Galaxy Note II.

Your phone should now be unlocked, and ready for use with any carrier. Please note that you will NOT receive any sort of confirmation on the screen, so just put in a different carrier’s SIM and try it out.
For more details and technical assistance, check out the XDA forum thread below.

(Source: XDA-Developers forum thread)

You can follow us by "like" our Facebook page to keep yourself updated on all the latest from Microsoft, Google, Apple and the web.

How To SIM Unlock Samsung Galaxy S4 GT-I9505 For Free

Having a network locked device can really hamper how you use it, especially if the network isn’t of your choice. While most of the times, the operator in question would let you unlock your device for a small fee, not everyone might be that lucky. Imagine a scenario where you’re travelling abroad and want to use another network’s SIM card, only to discover that you cannot thanks to a carrier lock. Unlocking can really save you from quite a few hassles and tight spots.

As a rule, you can get almost any device unlocked by paying a small fee directly to the carrier, or to several online services that would let you purchase an IMEI unlock. However, in my personal experience, nothing beats the feeling of doing such a process yourself, and save those precious bucks in the process. Samsung, generally, has been more relaxed towards letting its users carry out a network/SIM unlock on their devices on their own, provided they knew the right steps to follow. Earlier, we brought you a tutorial on how to carrier unlock Samsung Galaxy S III and Galaxy Note IIfairly easily without any specialized tool. Today, we’ll guide you through unlocking of the new flagship from Sammy, Galaxy S4 GT-I9505.

GS4

Before we proceed, please be advised that the usual disclaimer applies. Playing around the carrier lock is risky business, and more complicated than your average Android modding. Follow these instructions at your own perusal. Redmond Pie cannot be held liable for any loss whatsoever resulting from following this method. Also, this method applies to GT-I9505 only, and not to other variants of Galaxy S4.

Step 1: Launch the Phone app on your Galaxy S4, and dial in: *#0011#

Step 2: Press the Menu button followed by the Back key. Then, hit the Menu button again and select KEY INPUT. Enter 1 and press the OK button to enter ServiceMode.

1

Step 3: Press Menu one more time and tap back again. This will pull up the Main Menu forServiceMode. Tap [1] UMTS.

2

Step 4: Now select [1]DEBUG SCREEN, followed by [6] PHONE CONTROL.

3

Step 5: From the next screen, pick [6] NETWORK LOCK.

4

Step 6: You’ll get three options. Hit the one that says [3] PERSO SHA256 OFF.

5

Step 7: Now, you need to get back to Main Menu. To do this, hit the Menu button followed by theBack key. In Main Menu, now pick [6]COMMON, and then [6] NV REBUILD.

6

Step 8: The phone will tell you that a Golden Backup exists. Tap [4] Restore Back-up.

7

Your device will now go through a series of “conditions”, where it will first freeze, then get on a black screen with Blue LED on and both capacitive buttons on, after which it will reboot automatically. The whole cycle might take a couple of minutes, so be patient. Once it powers back on, it’s network unlocked, permanently. Enjoy!


Thanks, Caesar for the hat tip!

You can follow us by "like" our Facebook page to keep yourself updated on all the latest from Microsoft, Google, Apple and the web.

Install Android 4.2.2 On Galaxy S3 GT-i9300 (CM 10.1) [How-To Tutorial]

CyanogenMod 10.1 nightly builds based upon the very latest Android 4.2.2 Jelly Bean can now be installed on your Galaxy S III (GT-i9300). If you own this particular model, and wish to check out the latest nightlies, please check out our step-by-step tutorial after the break.

One of Android’s biggest assets is its ability to be modified extensively, and with CyanogenMod being one of the most popular aftermarket firmware ROMs around, many dev-orientated folks like to check out the nightly builds released in between main versions. If you just so happen to be one of those individuals, please check out the detailed tutorial below.

CM101 GS3

DISCLAIMER: Before we get started, please note that Redmond Pie will not be held responsible for issues that may aries with your device as a result of following this tutorial. Proceed at your own risk.
Additionally, since these nightly builds seldom run perfectly, we only advise installing on a spare Galaxy S III, as opposed to your daily driver. Again, we’ve warned you, this ROM might not serve as your daily driver, let’s begin!

Step 1: First off, you will need to root your Galaxy S III, and then flash ClockworkMod Recovery to it.

Step 2: Download the latest nightly of CM10.1 from the CM Downloads page, as well as GApps for CM10.1, which you can grab by doing a simple search on your favorite search engine. Once downloaded, drop them into the both into the /sdcard directory of your handset.

Step 3: Next, you will need to shut down your Galaxy S III before booting into ClockworkMod Recovery. If you’re unsure of how to do this, you just need to remember to hold Volume Up + Home + Power simultaneously.

Step 4: Take a Nandroid backup.

Step 5: Next, you’ll want to navigate to install zip from sdcard > choose zip from sdcard and then select your CM101.zip file. It’s best to rename the CM 10.1 zip you downloaded in Step 2 toCM101.zip so that you can locate it easily.

Step 6: Apply the same process as in step 5, but for GApps.

Step 7: From within the ClockworkMod main menu, select wipe data / factory resetand once the process is complete, opt to reboot system now from the main menu.

evo4gcm101 (1)

Provided  everything has gone as it should, your device will boot into the nightly build of CyanogenMod 10.1 (based on Android 4.2.2) you downloaded earlier on.

You can follow us by "like" our Facebook page to keep yourself updated on all the latest from Microsoft, Google, Apple and the web.

Download Android 4.2.2 ROM For Galaxy S3 GT-i9300 With Galaxy S4 Features

Although many have been swift to point out that, aesthetically at least, the Galaxy S4 isn’t as much of a bump from its predecessor as many expected it to be, in terms of new hardware and software, Samsung has really outdone itself. The processors are the strongest on the market, the camera is markedly improved, and the display is just gorgeous; that’s before you even get started on the multitude of new "S" features Sammy has bundled into the bargain. If you’re still languishing on your Galaxy S3 but wish to enjoy some of the new software improvements, a newly-leaked Android 4.2.2 ROM does exactly that. More details can be found after the break!

It’s a regular occurrence in the smartphone industry that when a new device is released, older models can often be left out in the cold. Often, this is because the vendor wishes to coerce consumers into grabbing the newer device, which although frustrating, is perhaps understandable. Sometimes, it’s simply because those antiquated handsets simply don’t harness the power to manage any of the new features, but with some variants of the Galaxy S III packing a quad-core processor, that simply is not the case here.

Android4.2.2GalaxyS3

Besides, Samsung has a relatively good track record when it comes to looking out for those loyal owners of previously-released devices, and if you’re currently wielding a Galaxy S3, many of those intriguing new features of the S4 are soon to be heading your way.

As indicated by a new Android 4.2.2 ROM leak for the Galaxy S3, an OTA should be forthcoming, but if you want to go ahead and get flashing right now, well, you can! A leaked ROM for the GT-i9300 on Android 4.2.2 brings most of those Galaxy S4 features to your handset.

GS3 Android 4.2 (2)


From lock screen widgets and new display modes, to Driving Mode and the enhanced S Voice, the news of this leaked release should be more than exciting to you S3 users out there. Obviously, some of the S4′s marquee features such as Air View are not included, since they are reliant upon the new flagship’s hardware, but nevertheless, this is worth checking out if you’re okay with flashing leaked, possibly unfinished firmware.

For flashing this leaked firmware, you will need to use Odin, which is already included in the package, put your phone in download mode, and install it from there on.

GS3 Android 4.2 (1)

Download Android 4.2.2 for Galaxy S3 GT-i9300 I9300XXUFME3_I9300OJKFME1_ILO.zip from here: goo.gl/Jai7b

(source: SamMobile)

You may also like to check out: