Monday, 3 June 2013

Samsung Announces Galaxy Tab 3 8-Inch & Galaxy Tab 3 10.1-Inch


Galaxy-Tab-3-8-10-1


Samsung has today added two new tablets to its Galaxy Tab 3 family which will join the 7-inch model that launched back in May. One of them has an 8-inch display and is “designed to be held in one hand,” while the other has a 10.1-inch display for an “amplified multimedia experience.”
Samsung is always working to offer its products in as many shapes and sizes as it possibly can, so we knew it wouldn’t be long before new tablets were added to its latest Galaxy Tab 3 line. Here’s what you can expect from each device:

Galaxy Tab 3 8-inch Specifications


  • Android 4.2 Jelly Bean with TouchWiz
  • 8-inch WXGA (1280×800) TFT display with 189 pixels-per-inch
  • 1.5GHz dual-core processor
  • 1.5GB of RAM
  • 16GB/32GB of internal storage
  • 5-megapixel rear-facing camera
  • 1.3-megapixel front-facing camera
  • Wi-Fi, 3G & LTE connectivity
  • A-GPS & GLONASS
  • microSD card slot (up to 64GB)
  • 4,450mAh battery
  • 209.8 x 123.8 x 7.4mm

Galaxy Tab 3 10.1-inch Specifications


  • Android 4.2 Jelly Bean with TouchWiz
  • 10.1-inch WXGA (1280×800) TFT display with 149 pixels-per-inch
  • 1.6GHz dual-core processor
  • 1GB of RAM
  • 16GB/32GB internal storage
  • 3-megapixel rear-facing camera
  • 1.3-megapixel rear-facing camera
  • Wi-Fi, 3G & LTE connectivity
  • A-GPS & GLONASS
  • microSD card slot (up to 64GB)
  • 6,800mAh battery
  • 243.1 x 176.1 x 7.95mm

Both devices also come pre-loaded with a plethora of Samsung apps and services — as we’ve come to expect from Samsung devices — including ChatON, Samsung Hub, Group Play, S Translator, S Travel, Dual View, Pop-up Video, WatchON, and more.

While the Galaxy Tab 3 10.1-inch may have the largest display, the 8-inch model actually looks like the better option — at least in my opinion. Both devices have the same resolution, so the smaller one has a greater pixel density, and therefore sharper text and images.

The 8-inch model also has more RAM and a better rear-facing camera.

Both devices will be available worldwide at the beginning of this month, Samsung says, but there’s no word on pricing just yet.

You can follow us by "like" our Facebook page to keep yourself updated on all the latest from Microsoft, Google, Apple and the web.


New Pebble Update Brings Notification Improvements, UI Tweaks & More


Pebble-Simplicity-face
The Pebble smartwatch has just received a new software update that makes a number of improvements to notifications, tweaks the device’s user interface, and fixes numerous bugs. It also adds a new watch face called Simplicity.
Here’s the complete list of changes with PebbleOS version 1.11:

What’s New

  • Improved Notification UI

  • Allows multiple notifications to be viewed if they arrive within a short time frame

  • Improved Set Time UI

  • Added the option of showing your current speed (as oppossed to your pace) in the RunKeeper application.

  • Swapped next and previous track buttons in the music application.

  • Added the Simplicity watchface.

  • Removed the Fuzzy Time watchface (it is available through the watchapp library).

Bug Fixes

  • Fixed a few issues where the bluetooth module would consume too much power.

  • Fixed an issue where rounded rects drawn with graphics_fill_rect did not handle being clipped properly.

  • Sped up text rendering when some of the text layer is clipped off the screen.

  • Fixed a bug where the vibrating motor would get stuck on.

  • Fixed a crash when changing windows, most commonly seen in the set time and set alarm UIs.

  • Fixed an issue where SMS messages on iOS would be incorrectly shown as an email with a very long subject line.

The Pebble is still in short supply at the moment, and it isn’t easy to get your hands on one. However, its creators are working hard to build as many as they possibly can. They’ve already shipped almost 70,000 units during the Pebble’s first year, and they expect to ship hundreds of thousands more in its second.

You can follow us by "like" our Facebook page to keep yourself updated on all the latest from Microsoft, Google, Apple and the web.


New Asus Transformer Pad Infinity Tablet Has As Many Pixels As A Retina MacBook Pro


asus-transformer-pad-infinity
Asus has today announced its latest Transformer Pad Infinity slate at Computex 2013 in Taipei, and boy is it a beast. Not only does it carry NVIDIA’s latest Tegra 4 processor — which has a 72-core GeForce GPU — but it also has a 10.1-inch display with the same 2560×1600 resolution as the 13-inch Retina MacBook Pro.

That’s a whopping 299 pixels-per-inch.

While that may not sound all that impressive when you compare it to some of the latest smartphone displays, it is pretty cutting-edge for a tablet. For instance, the iPad’s stunning Retina display, which is widely regarded as one of the best tablet displays on the market right now, has only 264 pixels-per-inch.

The new Transformer Pad Infinity also packs a 1.9GHz quad-core Tegra 4 processor, 2GB of RAM, and 32GB of internal storage. It has a full-size USB port for connecting game controllers and external storage devices, an HDMI port that will throw out Ultra HD 4K video — if you have a TV capable of displaying it — and a full-size SD card slot.

As far as cameras go, there’s a 5-megapixel shooter on the back, and a 1.2-megapixel shooter on the front.

Like previous Transformer Pad slates, this one comes with a keyboard dock that has a built-in microSD card slot, and possibly an extra battery — though that’s yet to be confirmed by Asus.
The Transformer Pad Infinity will launch with Android 4.2 Jelly Bean pre-installed, but there’s currently no word on pricing or availability just yet.


You can follow us by "like" our Facebook page to keep yourself updated on all the latest from Microsoft, Google, Apple and the web.


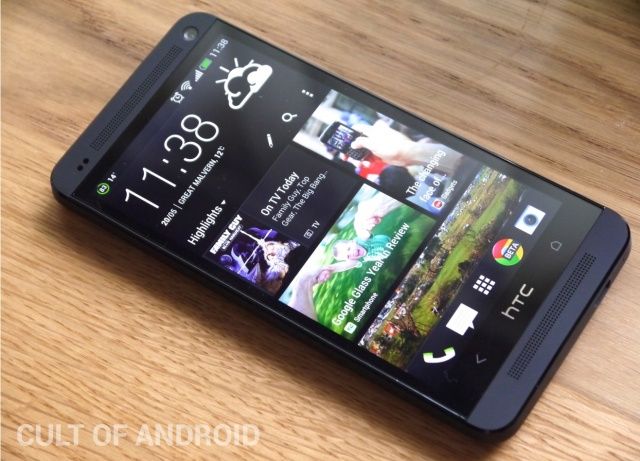
HTC One’s Android 4.2.2 Update Leaked, New Features Detailed


Black-HTC-One-BlinkFeed

One of the few disappointments with the HTC One is that it still runs Android 4.1, however, a new report suggests the latest Android 4.2.2 update isn’t far away. And for existing users, it’ll be well worth the wait, because it brings a whole host of new features.

The first change we will notice is the option to have the battery percentage displayed in the status bar, without having to download a third-party application from the Play Store. This can be activated in the power settings.

The second change brings some changes to the native Android quick settings. There are a few new toggles, including a change to the native power save mode, which no longer takes up space at the top of the notification pane.

Many users would agree that the virtual button situation on the HTC One is a bit odd, but the third change will reportedly bring more customization. Users will now have the ability to change the function of the long-press activation on the home button from Google Now to a custom menu button.

HTC’s next OS update also brings some minor adjustments, including Daydream, the ability to remove all icons from the dock, Blinkfeed has been improved and applications in the dock are not hidden in the app drawer.

This all sounds well and good, but it’s worth noting that this update is still unofficial, which means that the final build could look very different. We’re at least expecting the changes above, however, and possibly some more if we’re lucky.

You can follow us by "like" our Facebook page to keep yourself updated on all the latest from Microsoft, Google, Apple and the web.


Enhanced by Zemanta

How to Root the Samsung Galaxy S3 LTE I9305

Root the Samsung Galaxy S3 LTE I9305
After unveiling Samsung Galaxy S3 — one of the best selling smartphones in the world — Samsung decided to release an LTE enabled version of the device and as a result, we got the Samsung Galaxy S3 LTE I9305 smartphone. The device’s capable to run on any LTE network and is equipped with a quad-core processor to add into the performance of the device and to never let it down when you’re playing some huge games. A root method is out now for the said device and if you wish to root your device, you can do so by following our nice guide given below. It explains all the steps you should follow to root your Samsung Galaxy S3 LTE I9305 smartphone.

I. Before You Begin:

1. This should void the warranty of the device. However, you can reinstate the warranty by unrooting the device if there’s any unrooting procedure available.
2. Charge your device to have at least 60% of battery life left.

II. Downloading Required Files:

1. Odin (Download link’s given in the first post)
2. ClockworkMod Recovery (Download link’s given in the first post)
3. SuperSU ZIP (Download link’s available in the first post)

III. Installing ClockworkMod Recovery on the Samsung Galaxy S3 LTE I9305:

1. Place all the files you downloaded to your Desktop.
2. Extract files from the Odin archive to your Desktop.
3. Launch the Odin tool by double-clicking on Odin executable file.
4. In the Odin, click on PDA and select the ClockworkMod Recovery file you downloaded earlier.
5. Make sure that the Repartition box isn’t checked in Odin.
6. Turn OFF your device.
7. Reboot the device into Download mode by pressing and holding the Volume DOWN+Home+Power buttons together.
8. Connect the device to your PC using the USB cable.
9. Click on Start button in the Odin and it’ll begin flashing recovery.
10. Once it’s done, reboot the device.
11. You’re done!
Great! You have successfully flashed ClockworkMod Recovery on your device. Now, let’s root the device using the recovery you just installed.

IV. Rooting the Samsung Galaxy S3 LTE I9305:

1. Connect your device to your PC using the USB cable.
2. Copy the SuperSU ZIP file over to the root of your SD card.
3. Once file’s copied, unplug the device from your PC.
4. Turn OFF the device.
5. Reboot the device into Recovery Mode. To do that, simply hold down the Volume UP+Home+Power buttons together.
6. In the Recovery mode, choose install zip from sdcard followed by choose zip from sdcard.
7. Select the SuperSU ZIP file you copied earlier for flashing.
8. Wait till it finishes flashing the file.
9. Once it’s done, choose reboot system now from the Recovery menu.
10. You’re all done!
Amazing! You’re rooted as well as you got a custom recovery on your device. You can now start your journey to explore various custom ROMs as well as root-only apps!

V. Flash a Custom ROM (Optional):

1. If you are ready to flash custom ROMs on your device, head to the How To Flash a Custom ROM on the Samsung Galaxy S3 LTE I9305 to learn how to do that.
If this procedure helped you please thank/donate to the original developers here.
If you need help with this procedure, please ask in the comments below or in the forum.
You can follow us by "like" our Facebook page to keep yourself updated on all the latest from Microsoft, Google, Apple and the web.
Enhanced by Zemanta

Root Galaxy Note GT-N7000(SAMSUNG NOTE 1) On Android 4.0.3 ICS Without Increasing Flash Counter [How-To Tutorial]

Samsung’s half-smartphone half-tablet Galaxy Note recently received Android 4.0.3 Ice Cream Sandwich and there is good news for those of you who like to hack their devices: an easy-to-apply method has been unveiled that not only lets you gain root access to your Galaxy Note but also do it so without increasing the flash counter that causes a yellow ! sign to show up at boot time. We’ve prepared a step-by-step guide that you can follow right after the jump!

20120513100442402
The news comes straight from the Galaxy Note forum on XDA-Developers – a popular mobile software development community – in the form of a thread posted by developer deathst in which they discuss the method and how to go about applying it.

DISCLAIMER: Redmond Pie will not be held responsible for any loss of data or any damage incurred to your device in the following of this guide. Proceed at your own risk.

Important Note: There are reports of Galaxy Note devices being permanently bricked due to some bug in Samsung’s ICS kernel. To counter this, the developer suggests that you do not take NANDroid backups or restore using one.

Step 1: Download the following files from the official thread [XDA-Developers]:
  • CWM.zip
  • SU-Busybox-Installer.zip
Place all these files directly under /sdcard on your device’s internal memory.

Step 2: Shutdown your device. Once it is completely shut down, press and hold Volume Down + Power + Home buttons until you see a screen asking you to press to press Volume Up. Press said button to complete booting into Recovery Mode.

Step 3: Select apply update from external storage and then navigate to where you placed CWM.zip. Select it.

Step 4: Your device should now boot into ClockworkMod (CWM) Recovery.

Step 5: From CWM, choose install zip from sdcard > choose zip from sdcard > SU-Busybox-Installer.zip

Step 6: From main menu of CWM, choose reboot system now.

If you followed the steps correctly, your Samsung Galaxy Note International GT-N7000 will now be rooted on Android 4.0.3 ICS.
Galaxy Note ICS
For queries and help with unrooting your now rooted Galaxy Note, please visit the official thread linked to in Step 1.

You may also like to check out:
You can follow us by "like" our Facebook page to keep yourself updated on all the latest from Microsoft, Google, Apple and the web.

Root Galaxy S II On Android 4.0.3 ICS With CF-Root [How-To Tutorial]

News of an imminent Ice Cream Sandwich release for the Samsung Galaxy S II has been lingering for the past couple of weeks now, but it would appear those in desperate wait to install Android 4.0.x on their S II have had their prayers answered by Google.

Of course, no sooner does it break, does one of the talented developers acquire the root. Much like the iOS jailbreak community, which saw a jailbreak for iOS 5.1 just hours after Apple announced the release, Android developer Faryaab has created the method, based on Chainfire‘s popular CF-Roottool.

Galaxy-S-II

As per usual, the scoop comes courtesy of the guys over at XDA Developers – a popular hunt of Android enthusiasts, and we’ve compiled a step-by-step guide for those looking to root their newly ‘Ice Cream Sandwiched’ Samsung Galaxy S II!

DISCLAIMER: As usual, Redmond Pie will not be held responsible for any loss of data, nor if your device gets damaged in the following of this guide. Proceed at your own risk.

Since the CF-Root tool doesn’t come with a custom recovery like ClockworkMod Recovery, you’ll need to flash it yourself. Please check out our how to flash ClockworkMod Recovery tutorial for more information.

Step 1: Download the required kernel for your Samsung Galaxy S II:
Extract the .zip file.

Step 2: If your device is connected to your computer, please disconnect it.

Step 3: Download and launch ODIN v1.85 [XDA Thread]

Step 4: Click on PDA and select the CF-Root-xxx-vX.X.tar which will be located in the file you extracted in Step 1.

Step 5: Switch off your Galaxy S II, and once it is completely shut down, press and hold Volume Down + Power to place the device into download mode.

Step 6: Once in download mode, connect your Galaxy S II to your computer.

Step 7: Make sure you have not checked the Re-Partition option.

Step 8: Click on START and wait for your device to reboot.

If everything has gone as it should have, your Galaxy S II will now be rooted on Android 4.0.3 Ice Cream Sandwich.

If you have any queries, check out the official thread over on XDA.